Process
Reflection
Post-ExpoThe plan for most of development was two machines: one dedicated to camera detection and one running the Unity render. The codebase was built to support that split. What actually happened at the expo was everything ran on one PC, my desktop with an RTX 2070, camera detection, the FastAPI server, and the full Unity render all sharing the same GPU.
That mattered more than I expected. The RTX 2070 is a good card, but running YOLOv8 inference and a real-time 3D scene simultaneously forces compromises. Shadow quality, scene complexity, render resolution, and frame rate all got squeezed. The forest still looked good, but it was visibly below what the project is capable of on better hardware. Rendering was the biggest limiting factor on the final visual quality.
The installation context was also a surprise. The space ended up being a green screen room: a TV on a stand in a blank white space. No plants, no ambient lighting, nothing to give the physical room any relationship to what was on the screen. People stood in front of it and genuinely reacted. But a TV in a bare room is a very different experience from a screen placed inside a space that feels like it was designed around it.
Both of those things point to the same lesson. If this framework gets applied to a different building, a longer installation, or a more public context, computing power and physical environment are the two things that change the ceiling. More GPU headroom means higher-quality renders, more simultaneous cameras, and room to add complexity without fighting the hardware. A more considered installation context, even just some plants and warm lighting, changes how the piece reads. The concept is a digital terrarium, and a terrarium needs an environment to live inside.
Weeks 12-15: Final Assets, Weather & First Full-System Test
Mar 31 - Apr 24, 2026Goals
- Push the Unity scene from prototype into something closer to the final installation render.
- Replace placeholder vegetation with assets that can handle growth states, wind, and performance.
- Tie more of the environment to live values: particles, wind, rain, sky, and camera motion.
- Run the whole setup in my room and see what happens when the pieces stop being separate tests.
What I Accomplished
Custom SpeedTree Growth Assets
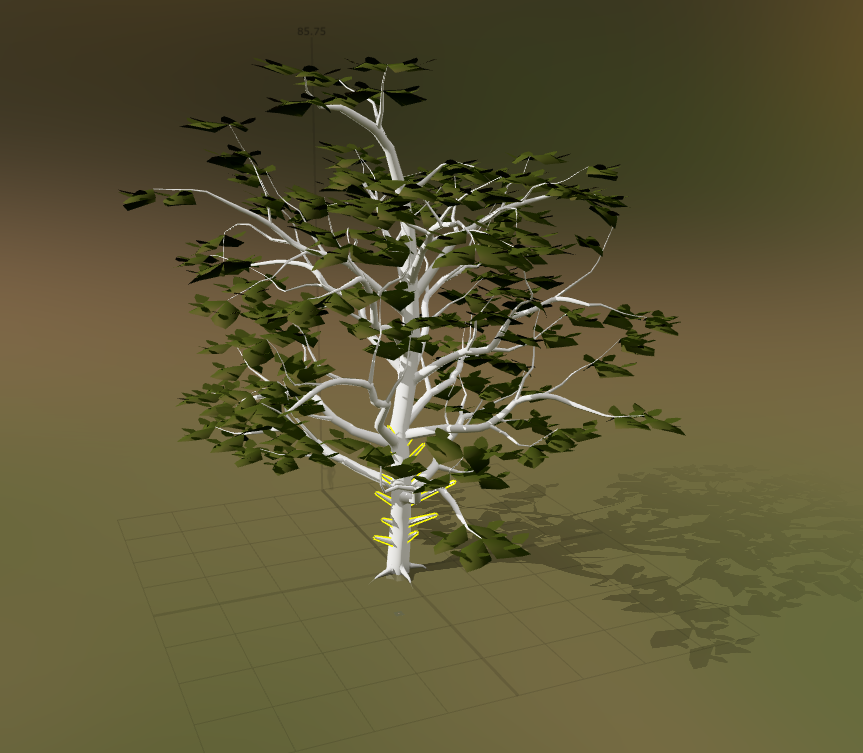
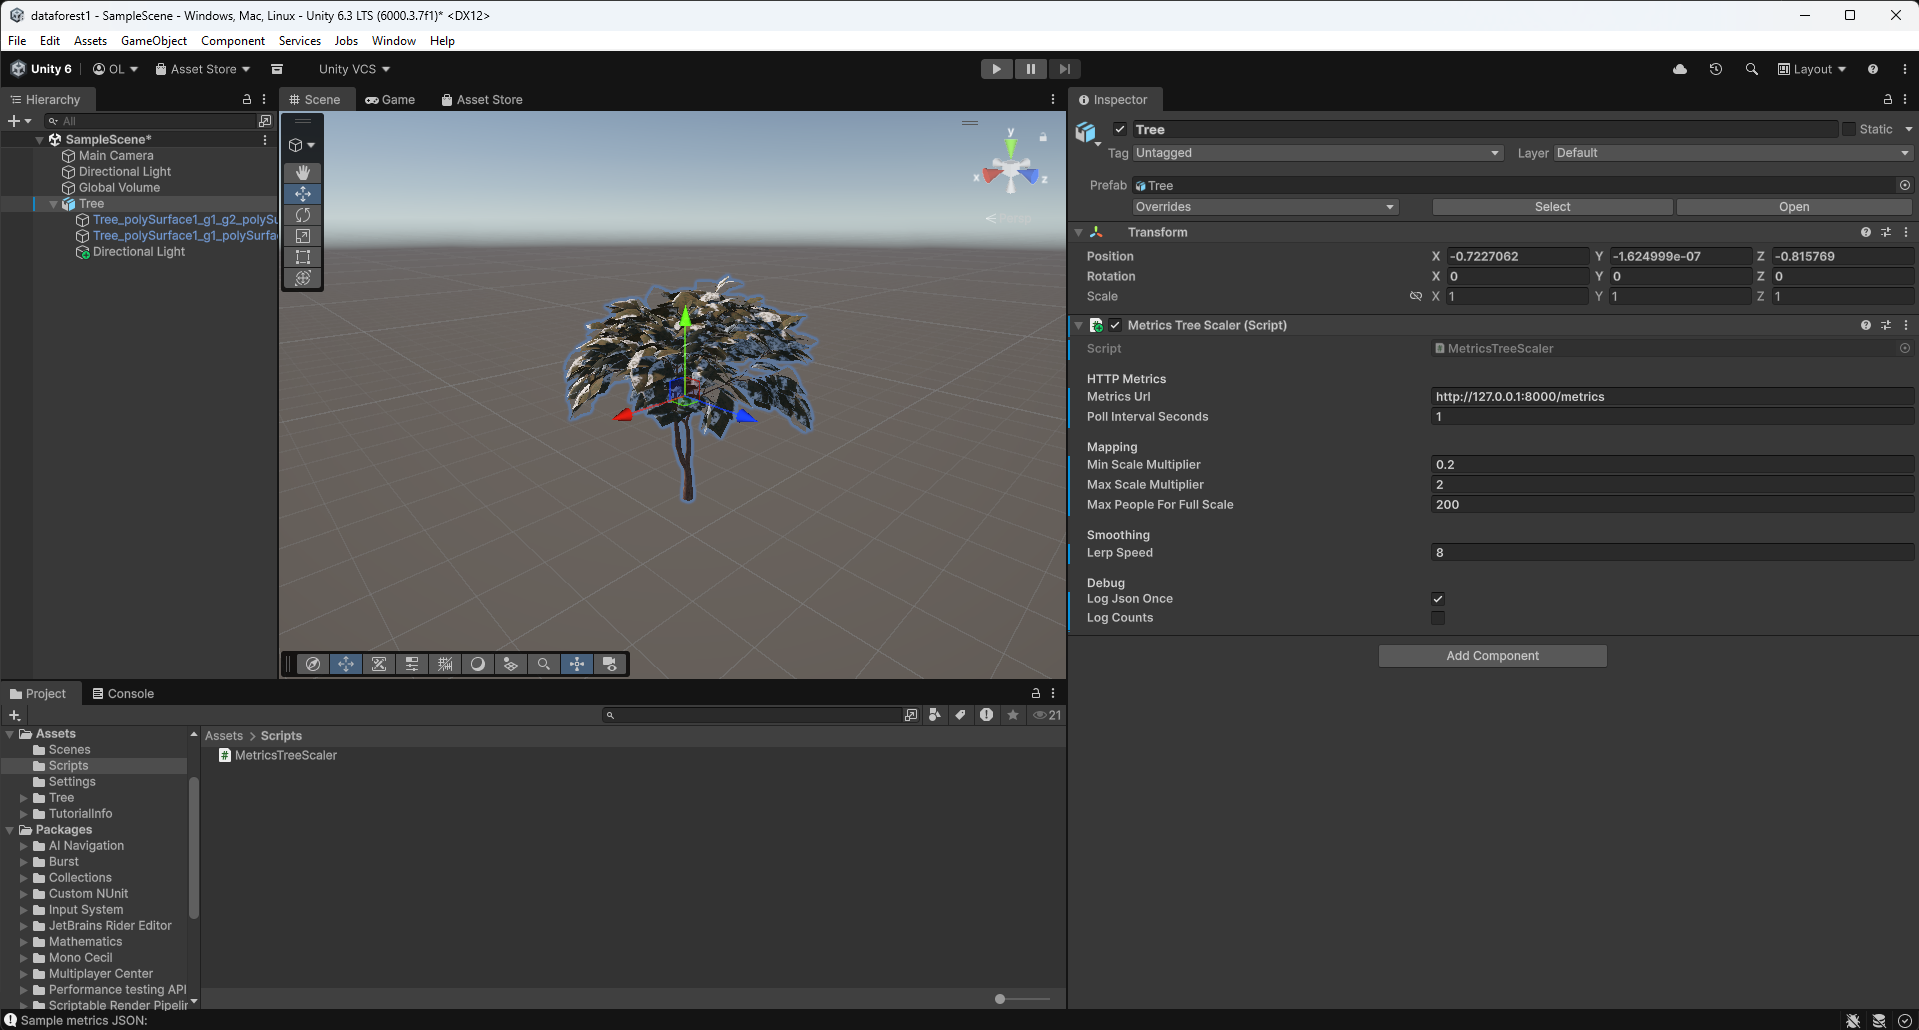
I built and integrated custom SpeedTree assets for the main forest vegetation. The key asset is a large oak tree with four growth states: a stump, a leafless tree, a more developed tree with extra branches and early leaves, and a fully branched, fully leafed version. That gives the biomass system real visual steps instead of just scaling one tree model up and down.
The oak includes LODs, wind physics, and optimized textures. It needs to hold up when the camera gets close, but it also has to stay light enough to run with the rest of the scene.
Grass Base and Vegetation Wind Response
I added a new Asset Store grass asset for the base of each zone. It gives the micro-zones a better ground layer, so the trees and particles do not feel like they are floating over an empty floor.
The grass and tree now react to wind at the same rate and direction. That small detail helps the vegetation read as one environment instead of a stack of unrelated assets.
Noise-Driven Particle System
I connected the particle system to the noise parameter. The firefly-like particles are no longer just decoration; they now respond to the room and give noise its own visual channel.
Reactive Rain and Sky Behavior
I added a rain system from the Asset Store, from the same creator as the grass asset, and started connecting it to the secondary interactive layer. Rain now works with a new sky asset, so the sky can shift when the rain is active.
This makes the render feel less like a collection of plants and more like a complete environment. Weather and atmosphere are now part of the response.
Camera Movement Expansion
I added more camera movements and tightened the movement pattern. The camera now has a better rhythm between close views of the reactive zones and wider views of the whole scene.
First Full-System Room Test
I tested the system in my room with the major pieces running together for the first time. Camera input, detection, Unity polling, growth states, grass, tree wind, particles, rain, sky behavior, and camera motion all had to coexist in one runtime. That made it a very different test from checking each part on its own.
Key Insights
- A tree needs real stages - The four-stage oak reads better than one model being scaled. A stump, bare tree, partial canopy, and full canopy are easier to understand at a glance.
- Wind has to agree - Matching the tree and grass wind direction immediately makes the scene feel more physically connected.
- Small channels carry a lot - Noise particles, rain, and reactive sky behavior make the system feel alive without asking tree growth to do everything.
- Optimization is part of the look - LODs, textures, and controlled motion are not just performance details. They decide whether the scene can actually run at the quality I want.
- Full-system tests tell the truth - Once everything runs together, the project becomes a different problem than it is in isolated tests.
Next Goals
- Capture final media showing people count to biomass, noise to particles, movement to wind, and pose interaction to rain.
- Tune the thresholds and smoothing after more full-system tests so the behaviors feel responsive without becoming visually chaotic.
- Continue performance checks with the final tree, grass, rain, sky, particle, and camera systems active together.
- Prepare final diagrams and install documentation for the How It Works page.
Week 11: Global Settings, Camera Director & Render Aesthetics
Mar 24 - Mar 30, 2026Goals
- Complete and import first SpeedTree tree models into Unity
- Develop particle system further and integrate into micro-zone behavior
- Finalize the ambient chord progression and begin mixing with natural audio textures
- Continue micro-zone refinement with new assets in place
What I Accomplished
ForestGlobalSettings ScriptableObject
I built a ForestGlobalSettings ScriptableObject so I could tune all four micro-zones from one place. Before this, every meaningful visual change meant opening each controller and editing values one by one. Now one asset controls growth timing, thresholds, scale ranges, breathing motion, firefly behavior, and camera parameters. Zone-specific fields like radius, prefab lists, seed, and camera index still stay local.
The asset also includes a global biomass override with freezeAllBiomass and globalBiomass. That made visual tuning much faster because I could lock every zone to the same value and judge the render without needing a live camera feed.
MicroForestZoneController: Globals Integration
I updated the zone controller so it can read from the shared globals asset through the inspector. If the asset is assigned, shared values come from it. If it is missing, the controller falls back to its local fields. That kept the change low-risk and let the shared system sit on top of the older per-zone setup.
ForestCameraDirector
I wrote a camera director that moves through all four zones on its own. It has two main modes: ZoneTour and Overview.
In ZoneTour, the camera visits zones 0 through 3 and positions itself relative to each zone's actual 3D location. That mattered because the zones sit at different floor levels in the building. An early version used offsets from the world origin, which looked fine until elevated zones left the camera in the wrong place. The director now reads each zone's world position first, then builds the camera offset from there.
After a full tour, the camera switches into Overview. It finds the 3D center of all zones, computes a bounding sphere, and orbits around the group with a wider field of view. If zone positions change, the overview adapts with them.
Biomass spike detection can interrupt the tour and cut directly to the zone that just became active. The component also supports right-click force transitions in the inspector, which makes testing much less annoying.
ForestCameraDirector in action: ZoneTour visiting elevated zones, then transitioning to a bounding-sphere overview orbit.
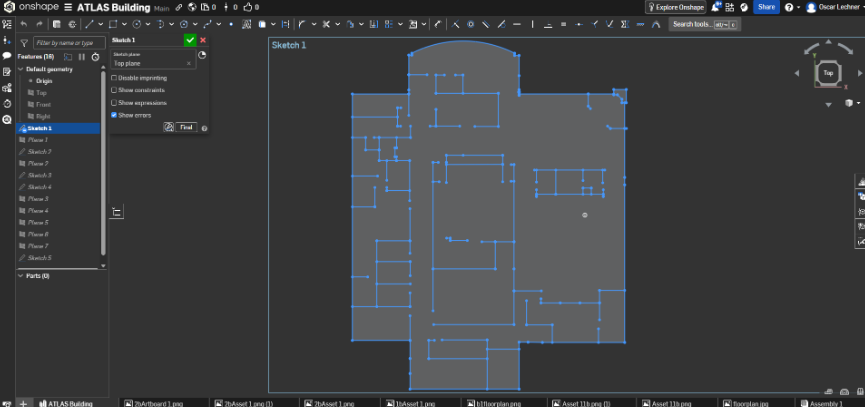
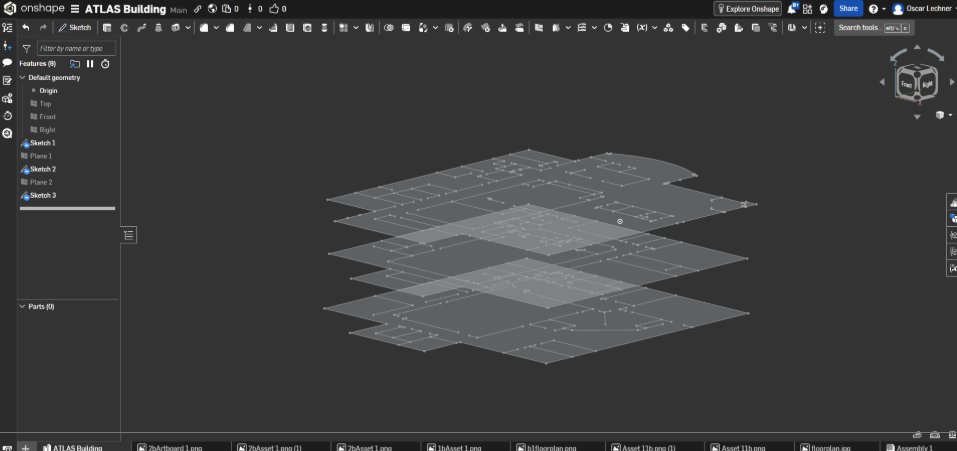
CAD Model Import & Zone Placement
I continued importing the Atlas CAD model and placing the four micro-zones inside it. The camera director only works if those zones match their real locations in the building, so the spatial mapping had to be cleaned up before the camera work could really make sense.
Ambient Audio Progress
I made smaller progress on the secondary interactive music layer. The ambient chord progression kept developing, though most of this week went toward the visual systems.
Key Insights
- One settings asset changes the workflow - Centralizing values made tuning feel immediate instead of abstract. I could move a slider, watch all zones update, and decide by eye.
- Camera positions need local anchors - Offsets from world origin were too brittle. Anchoring to each zone's world position fixed the camera placement cleanly.
- Dynamic framing is worth it - Hardcoding the overview would have been faster, but computing it from the actual zones means the camera survives layout changes.
- Global overrides make visual tuning easier - Freezing all zones to the same biomass value separated visual work from the live data pipeline, which saved a lot of time.
Next Week Goals
- Implement lighting system and firefly particle prefab
- Hook up wind simulation to vegetation layers
- Start the cloud and rain system
- Continue SpeedTree growth stage development and asset import
- Complete CAD zone placement and begin two-PC network test
Week 10: Atlas Rebuild, SpeedTree, Particles & Ambient Audio
Mar 10 - Mar 16, 2026Goals
- Finalize SpeedTree custom tree models and import into Unity
- Complete asset evaluation and integrate final vegetation set into micro zones
- Implement interactive audio changes based on human testing feedback
- Continue refining micro-zone behavior and visual fidelity
What I Accomplished
New Atlas Building CAD Model
I rebuilt the Atlas CAD model from scratch. The first version was usable, but the proportions were off and the geometry was rough. This version is much closer to the real building and cleaner to work with in Unity. Since the micro-zones map to real locations, that accuracy matters.
Micro-Zone Behavior Improvements
I kept tuning the growth curves and layer logic. Small data shifts read more clearly now, and sustained high activity produces much denser growth. The difference between a quiet zone and an active zone is easier to see from across the room.
SpeedTree Asset Creation
I started building my own trees in SpeedTree instead of relying only on asset packs. SpeedTree lets me control the polygon count, silhouette, and scale for this specific installation. The first models are in progress, and the workflow is promising.
Particle System Experiments
I started playing with Unity's particle system to add another layer of life to the zones: drifting spores, light motes, subtle pollen, and small motion that can keep the scene active even when growth values are low. Early tests look good. The hard part is keeping it subtle.
Ethereal Ambient Chord Progression
I started composing the default ambient audio for the installation. This is the baseline sound before any poses are detected. Based on testing, I am leaning toward a slow harmonic chord bed rather than only literal nature sounds. It should set the mood without calling too much attention to itself.
Key Insights
- Spatial accuracy compounds - A more precise CAD model improves zone placement, camera mapping, and the overall visual layout.
- Custom assets are worth the time - Generic tree packs force compromises in silhouette, scale, and rendering cost. SpeedTree lets the assets serve the project instead.
- Particles add life at low cost - A sparse particle layer can make a low-activity scene feel inhabited without much performance cost.
- Baseline audio matters - The default sound is not background filler. It shapes how visitors enter the installation before they interact.
Next Week Goals
- Complete and import first SpeedTree tree models into Unity
- Develop particle system further and integrate into micro-zone behavior
- Finalize the ambient chord progression and begin mixing with natural audio textures
- Continue micro-zone refinement with new assets in place
Week 9: Micro-Zone Polish, Slideshow & SpeedTree Development
Mar 3 - Mar 9, 2026Goals
- Improve the slideshow
- Create SpeedTree workflow and custom tree models
- Continue improving micro zones
- Apply human testing feedback to the interactive audio layer
What I Accomplished
Micro-Zone Aesthetics & Performance
This week I gave the micro-zone system its biggest visual upgrade so far. Before, prefabs snapped in and out as biomass crossed thresholds, which made the growth feel fake. I replaced that with continuous scaling. Prefabs now enter at near-zero scale, grow into place, and shrink back down when conditions fall. The zone no longer pops; it breathes.
I also added subtle per-prefab motion. Each plant oscillates at a slightly different rate, so the scene has a small amount of natural movement without spawning or destroying objects every frame.
The grass layer is now a more continuous base instead of scattered individual blades. It grows in first, before taller vegetation, which makes the zone feel more grounded and gives the rest of the growth something to emerge from.
Slideshow & Demo Video
The project slideshow is complete. It now includes a demo video of the micro-zone system: growth transitions, the motion system, and the grass base layer all visible in real time. The video will be useful for anyone who cannot experience the installation live, and the slideshow is ready for presentation.
In Progress
- SpeedTree asset creation - I am building custom tree models to replace the placeholders in the micro-zones. The workflow is set up and the first models are taking shape, but they are not finalized yet.
- Asset search - I am also looking for supporting vegetation: understory plants, ferns, moss, and ground cover. I have found a few strong candidates, but final selection depends on how the SpeedTree models develop.
Key Insights
- Smooth transitions matter more than expected - Replacing pop-in with scaling changed the feel of the whole zone. Small behavior changes carry a lot of visual weight.
- Layered growth feels more believable - Grass first, then low plants, then taller trees gives the system a simple ecological logic.
- Small motion goes a long way - Subtle randomized plant movement adds life with very little cost.
Next Week Goals
- Finalize SpeedTree custom tree models and import into Unity
- Complete asset evaluation and integrate final vegetation set into micro zones
- Implement interactive audio changes based on human testing feedback
- Continue refining micro-zone behavior and visual fidelity
Week 8: Motion Data Type, Human Testing, Micro-Zone MVP
Feb 24 - Mar 2, 2026Goals
- Complete node aggregation for multi-computer setup
- Finish motion tracking and blob centroid work
- Rebuild and import the Atlas CAD model into Unity
- Finalize installation screen layout
What I Accomplished
Motion Tracking
This week I added a new environmental data type to the camera system: motion level. Each camera now compares frame-to-frame pixel changes and tracks blob centroids over time. That gives the system a way to read energy, not just presence. A quiet crowd and a moving crowd can now produce different signals inside each micro-zone.
Human Testing: Forest Audio In-Room Interactive Element
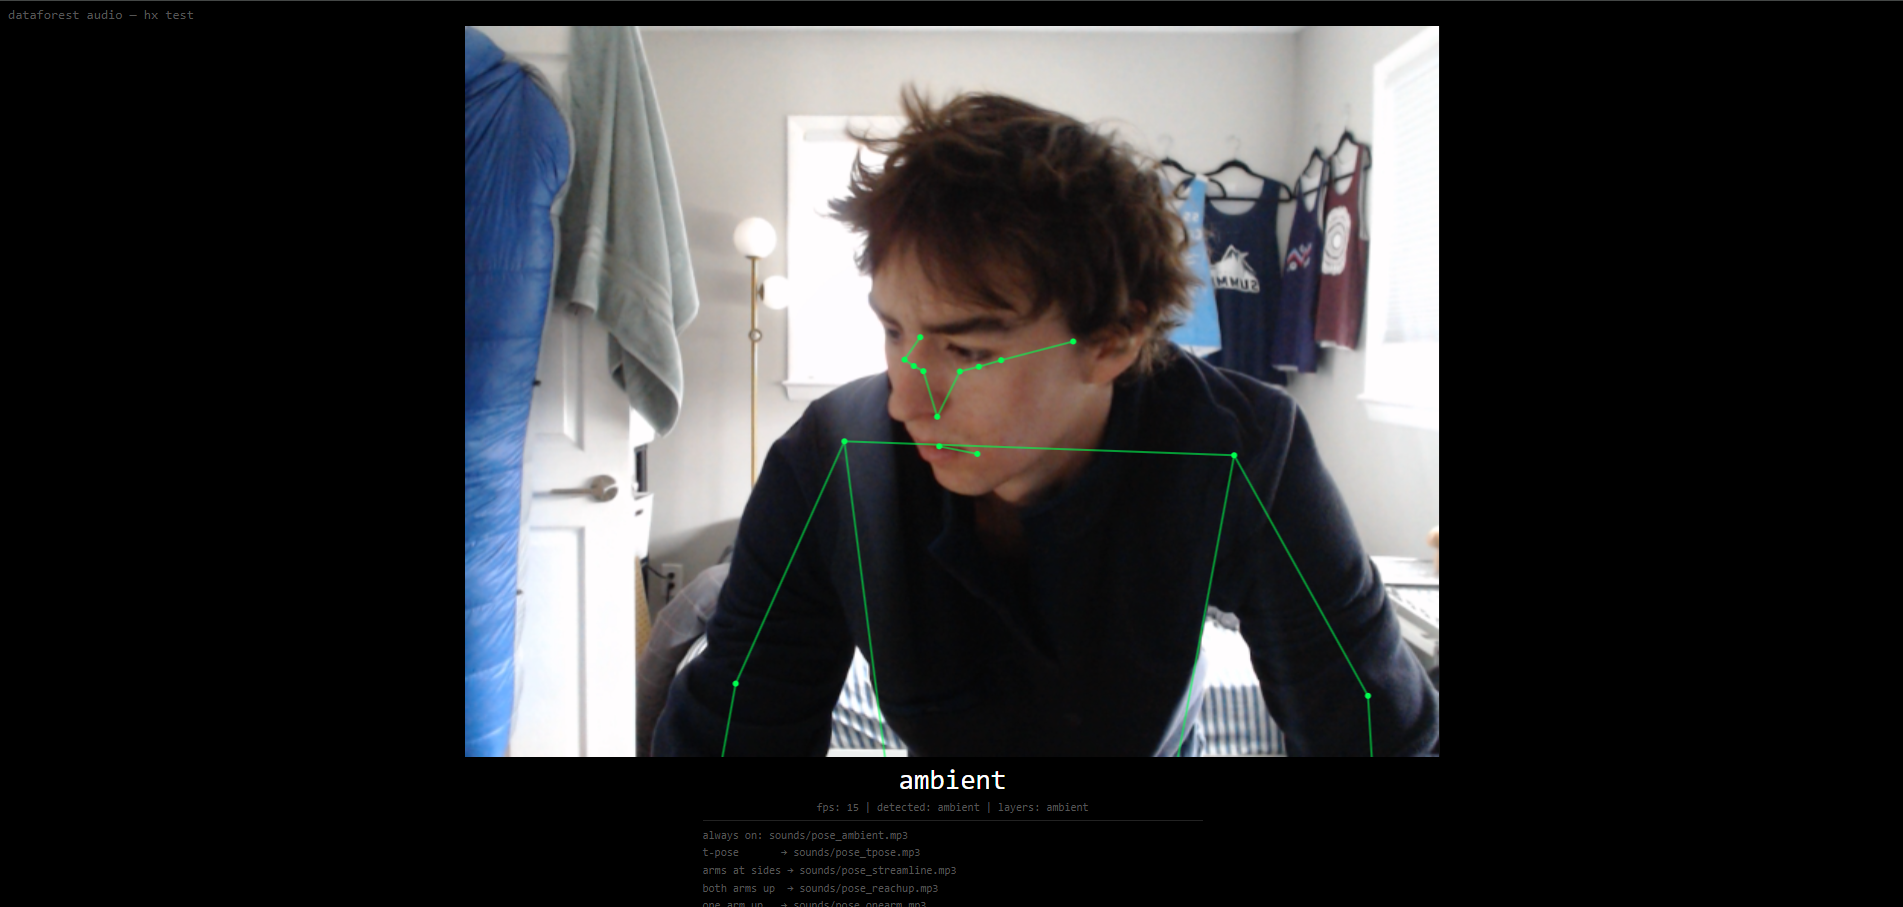
I ran structured testing with one classmate, my professor, and three additional participants. The interactive audio piece runs separately from the main Unity render and uses a webcam for skeletal pose detection. A baseline ambient track is always present, and four simple poses trigger birds, crickets, wind, and rain.
The clearest result was rain. When rain activated, people reacted immediately. Several testers said the room felt more emotionally clear once the rain layer came in, and many suggested mapping it to both arms raised, almost like receiving rain. That gesture felt right for the piece.
Transitions also stood out. If sounds enter too suddenly, the illusion breaks. If they fade in too softly, people miss the interaction. The next version needs better mixing, layering, compression, and speaker testing, since this round used headphones.
I tested two baseline options: realistic forest ambience and more ethereal harmonic chords. Both worked, but for different reasons. The forest ambience grounded the space, while the chords made it feel more abstract and contemplative. The next version will probably combine them carefully.
A design question also came up: how will people know poses exist? Some testers explored naturally. Others waited for instructions. I still need to decide whether that guidance belongs inside the room, outside the room, or should stay mostly discoverable.
A few participants recognized pose-controlled audio from social media and tried moving slowly between poses to find gradients. That raised a useful question: should the system interpolate between poses, or stay discrete and event-based? For now, discrete pose states still feel clearer.
I also learned that simultaneous poses should layer sounds instead of replacing each other. If multiple people interact at once, the room should feel collective, not like everyone is fighting for control.
Micro-Zones
I continued iterating on the micro-zone system, refining how incoming sensor data maps to growth behavior inside each zone.
Node Aggregation
After evaluating wireless syncing and relay options, I decided the most stable expo setup is a direct wired Ethernet connection between the two machines. A long dedicated Ethernet cable will connect my detection desktop to the primary Unity render machine. This keeps the network simpler and gives the metrics stream a better chance of staying reliable during the live install.
Key Insights
- Embodied interaction changes the meaning - Rain worked because the sound and gesture supported each other.
- Sound design is structural - Audio mixing, layering, and transitions matter as much as the visual growth rules.
- Clarity and mystery are in tension - If poses are too hidden, people miss them. If they are too explicit, discovery disappears.
- Layering makes it social - Multiple simultaneous pose triggers make the piece feel collaborative instead of individually controlled.
Next Week Goals
- Improve the slideshow
- Create SpeedTree workflow and custom tree models
- Continue improving micro-zones
- Apply human testing feedback to the interactive audio layer
Week 7: Noise Tracking, Forest Audio, and Multi-Node Setup
February 17-23, 2026Goals
- Add a second data type to the camera system beyond person count
- Build an in-room interactive element for the installation
- Continue micro-zone development
- Begin multi-node data aggregation for the final expo hardware setup
What I Accomplished
Noise Level Tracking
I added microphone-based noise tracking to the existing camera system, using the webcam microphones already in the setup. Noise is now captured alongside person count and plotted as a third stream in the dashboard. A loud, busy space can now produce a different forest response than a quiet one.

Forest Audio In-Room Interactive Element
I built a standalone interactive audio piece in a small separate repository. It is a single HTML file that runs in the browser, uses the webcam to detect skeletal poses, and changes the installation audio based on body position.
Four poses map to birds, crickets, rain, and wind through trees. These sounds layer over a persistent ambient track. It gives visitors a direct physical interaction to sit alongside the larger visual forest on the screens.
Micro-Zones
I continued iterating on the micro-zone system, refining how incoming sensor data maps to growth behavior inside each zone.
In Progress
- Node aggregation - The final expo setup will likely run across multiple computers: one stronger machine for the Unity render and my desktop for camera detection. I started building the data aggregation layer this week, but it is not complete yet.
- Motion tracking / blob centroid tracking - I started adding a third webcam data type that tracks movement and the centroid of detected blobs. This adds more than headcount: it can describe where people are and how much they are moving.
Key Insights
- Audio is a first-class output - The Forest Audio piece showed that sound can respond to people in a more intimate way than the large screen.
- More data types add expression - Noise and motion give the forest more to react to than a headcount.
Next Week Goals
- Complete node aggregation for multi-computer setup
- Finish motion tracking and blob centroid work
- Rebuild and import the Atlas CAD model into Unity
- Finalize installation screen layout
Week 6: Unity Assets, Micro-Zones, and Camera Refinement
February 10-17, 2026Goals
- Scale up the MVP simulation with more assets and a more reliable Unity data path
- Import the Atlas building CAD model into Unity
- Bring multiple potential designs to life for human testing
- Browse assets and test truly dynamic FBX models and L-systems
What I Accomplished
Unity Assets
I spent time in the Unity Asset Store looking for trees and foliage that could work for the installation. The ideal assets need to be affordable, easy to modify, and flexible enough to support growth behavior. I have not landed on the final pack yet, but I have been importing free assets to test the micro-zone system.
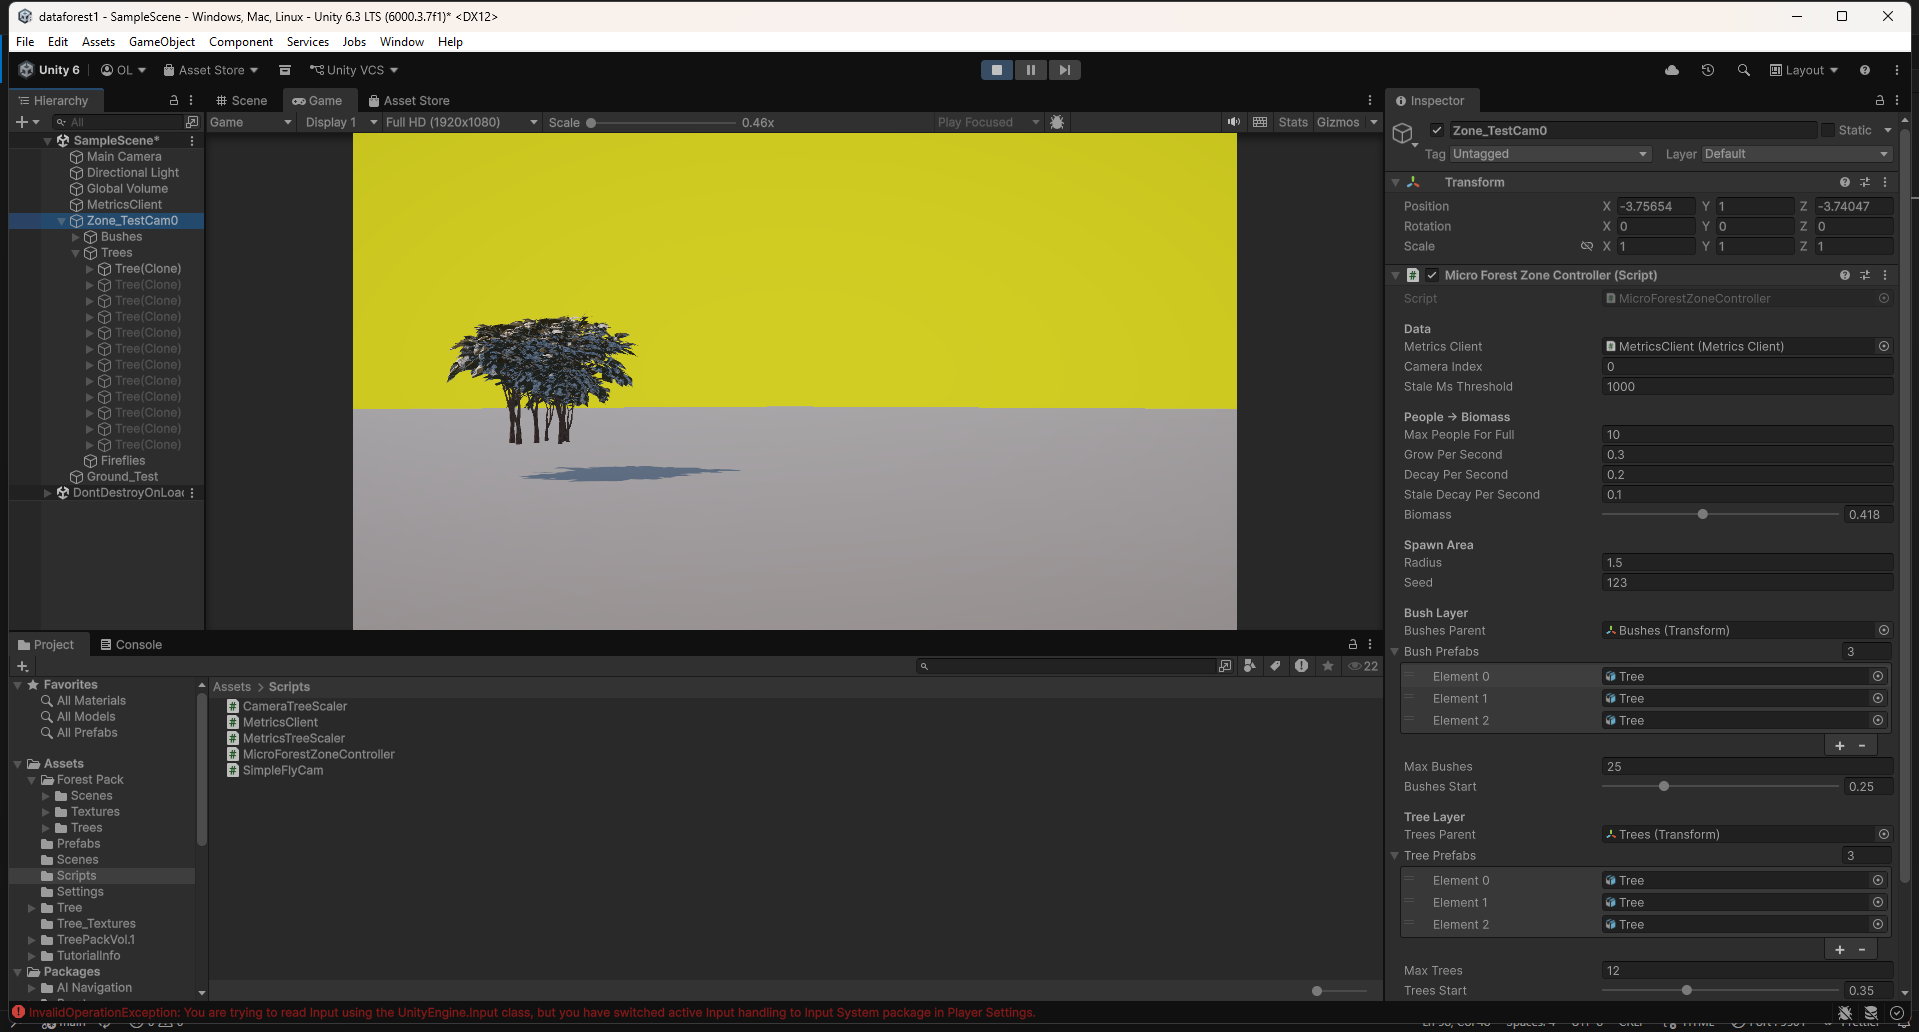
Micro-Zones
Each camera in the final installation will feed data into its own area of growth inside the simulation. I am calling these areas micro-zones. This week I built the first minimum viable version: a bounded spawn area, a curated set of vegetation assets, and a growth controller that maps incoming camera metrics to a continuous biomass value. That value drives staged spawning, scaling, and visual effects so the zone can grow from sparse seedlings into a denser micro-forest.
Camera Refinement
The final render will likely run on a different computer than my own, so I started evolving the camera software for a multi-machine setup. The plan is to have the stronger borrowed machine run the Unity render and one or two cameras, while my desktop handles additional camera detection and data aggregation. I also made the detection folder easier to move between machines and tuned the pipeline to take advantage of CUDA on my GPU.
Key Insights
- Camera detection needs to be fast and flexible - Optimizing the software now will make later testing much easier and keep the installation more responsive.
- Micro-zones need behavior and assets together - The growth logic only looks good if the vegetation assets support it. Finding the right assets at the right price is harder than expected.
Next Week Goals
- Continue micro-zone development
- Rebuild the Atlas CAD model and import it
- Finalize installation screen layout
Week 5: Expert Interviews & Pivoting to Unity
February 3-9, 2026Goals
- Seek expert feedback on the project direction and technical approach
- Validate aesthetic and interaction design decisions
- Evaluate whether TouchDesigner is the right tool for the 3D visualization
What I Accomplished
Expert Interviews
I conducted two expert interviews that shaped the direction of the project. Joel Swanson pushed me toward localized per-camera tree growth, suggested intermittent live events for engagement, and recommended a TV display over projection. Brad Gallagher helped me see that TouchDesigner was not the right tool for the 3D world-building I wanted, and pushed me toward Unity. Communication protocol was still open at this stage; the current system later settled on HTTP polling. See the Expert Reviews page for detailed feedback from both conversations.
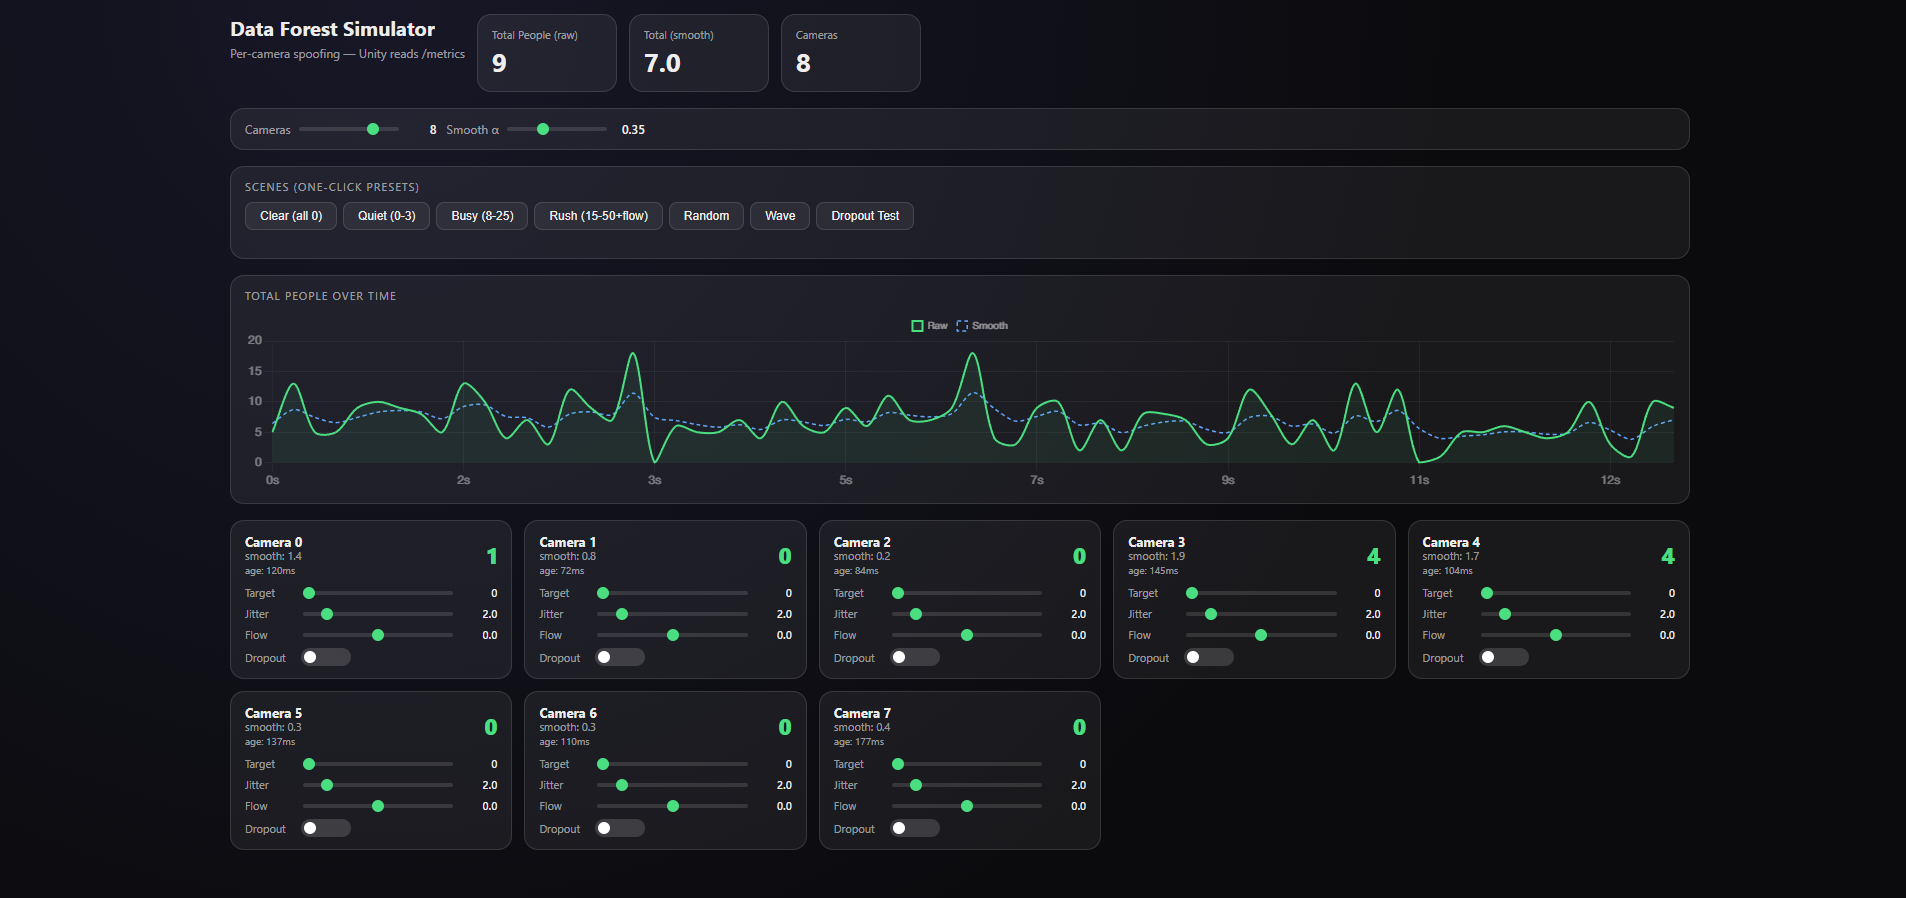
Camera Spoofing System
I built a spoofing system that simulates any number of cameras with configurable person counts. This lets me test how the visualization responds to different crowd scenarios without needing physical cameras or real foot traffic.
Pivoting to Unity + First Proof of Concept
Based on Brad's advice, I pivoted the visualization layer from TouchDesigner to Unity. The same week, I got the first camera-reactive scene working: a tree that grows based on the number of people detected. That proved the basic loop from camera detection to 3D visualization.
Key Insights
- Pivot early, not late - It is better to switch tools while the investment is still low than to fight the wrong tool for weeks.
- Expert feedback is invaluable - Both interviews surfaced ideas and approaches I would not have found on my own.
Next Week Goals
- Scale up the MVP simulation with more assets and a more reliable Unity data path
- Import the Atlas building CAD model into Unity
- Bring multiple potential designs to life for human testing
- Browse assets and test truly dynamic FBX models and L-systems
Week 4: CAD Modeling, Presentation & Pipeline Refinement
January 27 - February 2, 2026Goals
- Build a CAD model of the Atlas building for use in the installation
- Prepare and deliver the iteration 1 presentation
- Test the camera detection system in a real-world environment
- Refine the camera detection pipeline and address computing power limitations
What I Accomplished
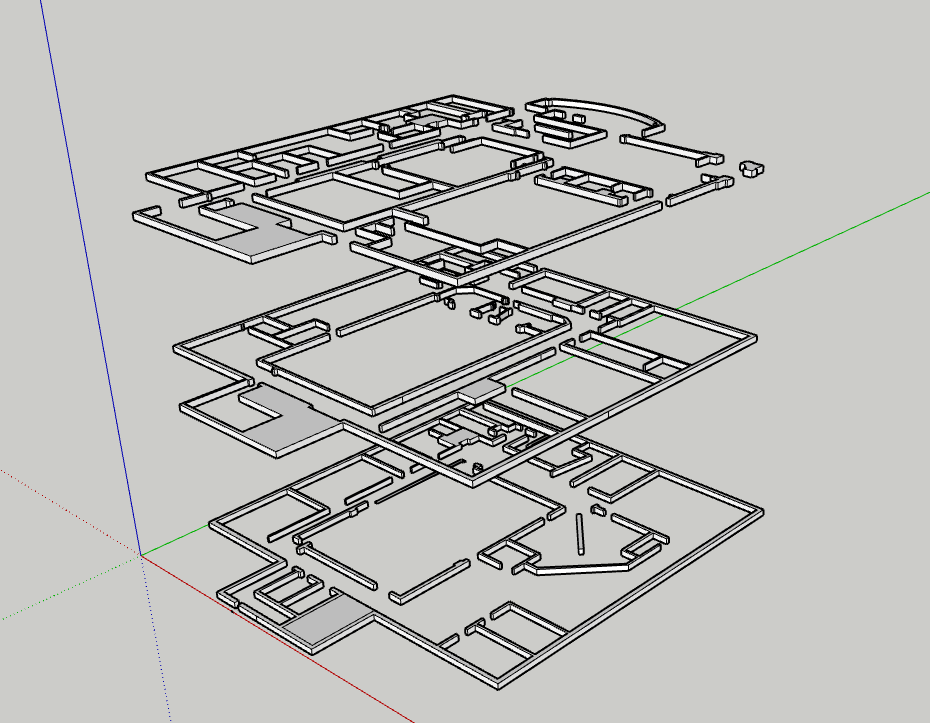
Atlas Building CAD Model
I built a 3D CAD model of the Atlas building covering the bottom three floors: the main floor, basement (B1), and subbasement (B2). This became the spatial base for the forest simulation, connecting real camera locations to where growth would happen in the visualization. I identified key high-traffic areas: the main atrium entrance, hallways near room 104, the B1 area around 1B25, and the black box.
Iteration 1 Presentation
I built and delivered my iteration 1 presentation, covering the project concept, technical approach, CAD model, and progress to date.
First Real-World Camera Test
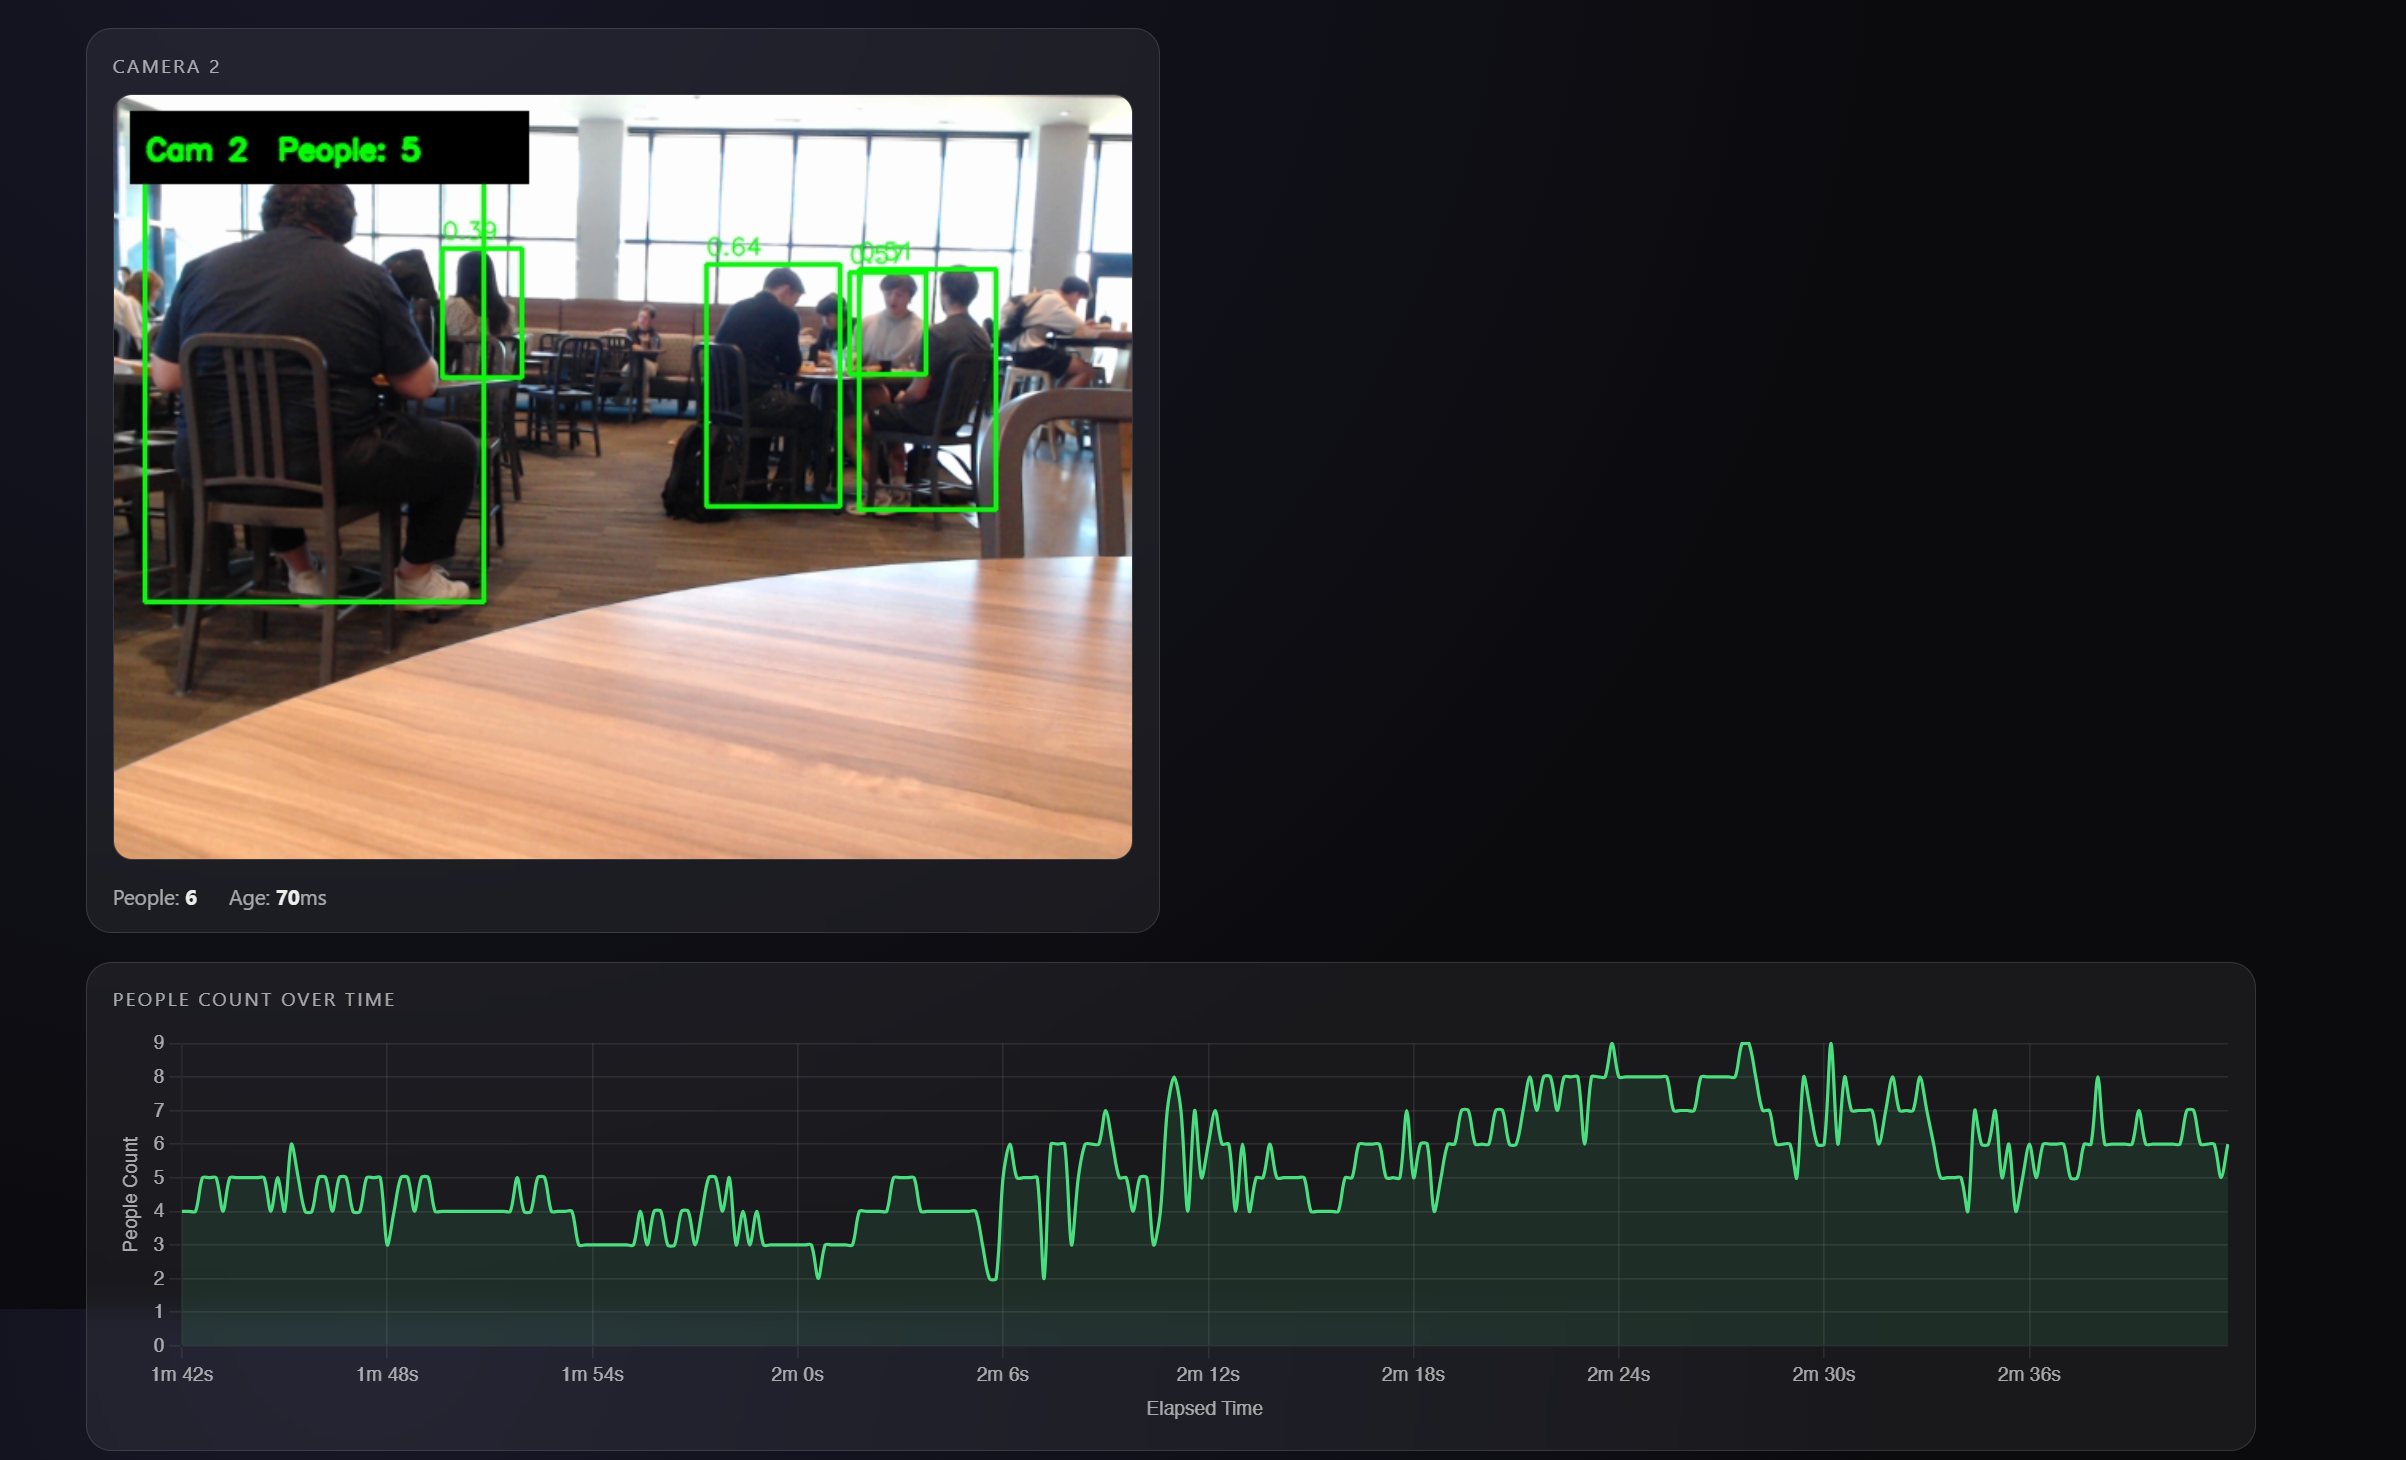
I completed my first real-world camera test in the Williams Village dining hall, taking the detection system out of my room and into a live, crowded environment with real foot traffic.
Camera Pipeline & Computing Power
Running multiple camera feeds with real-time YOLOv8 inference is demanding on one machine. I started exploring a split setup, with detection and visualization running on separate computers, to keep frame rates stable as the camera count increases.
Key Insights
- Spatial planning matters - The CAD model revealed practical constraints, like placing cameras near stairwells for wired connections.
- High-traffic zones are predictable - Past expos show consistent patterns in where people gather, which helps prioritize camera placement.
Next Week Goals
- Seek expert feedback through interviews with professors
- Begin building the forest visualization
- Continue optimizing the detection pipeline for multi-camera performance
Week 3: Multi-Camera Person Detection Server
January 20-26, 2026Goals
- Build a real-time person detection backend
- Support multiple simultaneous camera feeds
- Create a metrics API for TouchDesigner integration
- Connect TouchDesigner to live detection data
What I Accomplished
Data Forest Sensor Server
I built a multi-camera real-time person detection system using FastAPI, OpenCV, and YOLOv8. Each camera runs in its own CameraGrabber thread, while a central SensorServer loop cycles through cameras and runs YOLOv8 inference to detect people.
Stack: Python, FastAPI, Uvicorn, OpenCV, Ultralytics YOLOv8 (nano), Pydantic
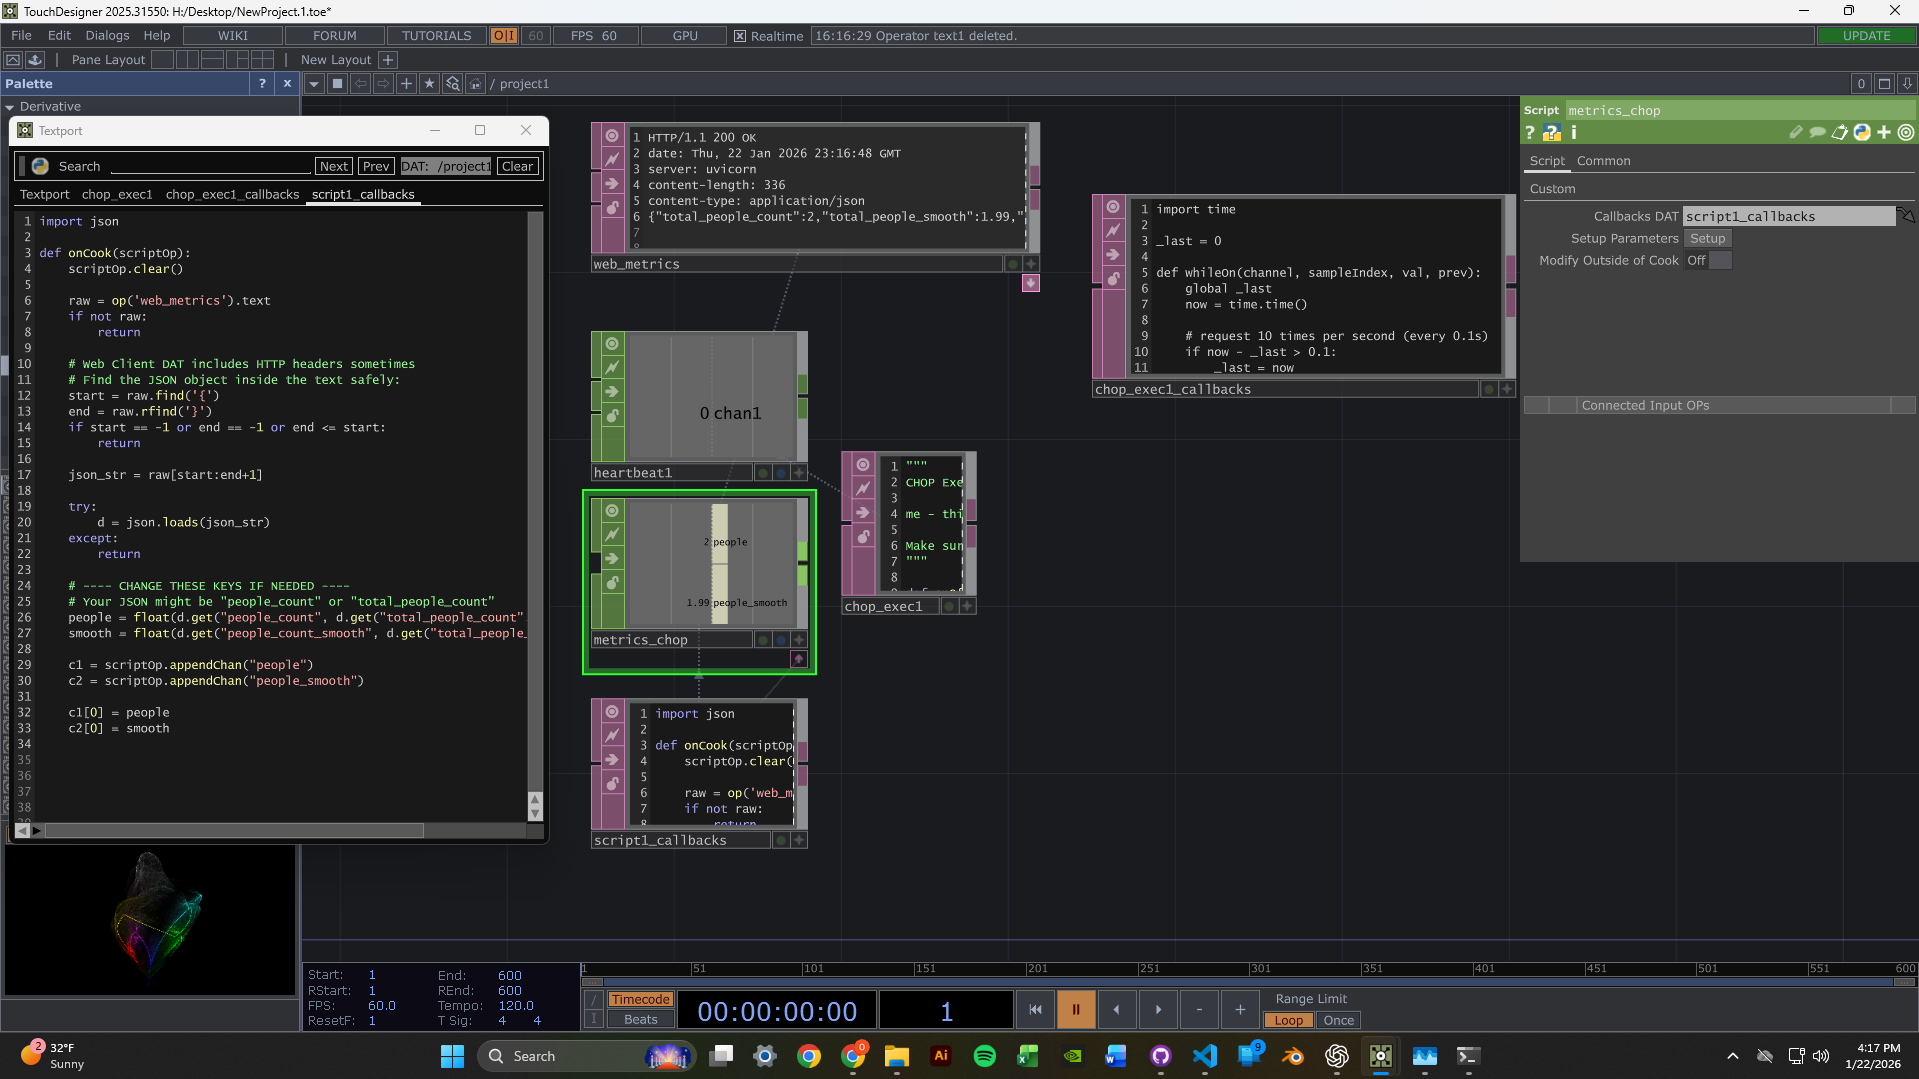
TouchDesigner Integration
I set up TouchDesigner to fetch data from the sensor server. The node network pulls metrics from the /metrics endpoint and can display the MJPEG video streams.
This YouTube channel helped a lot while I was learning TouchDesigner: The Interactive & Immersive HQ
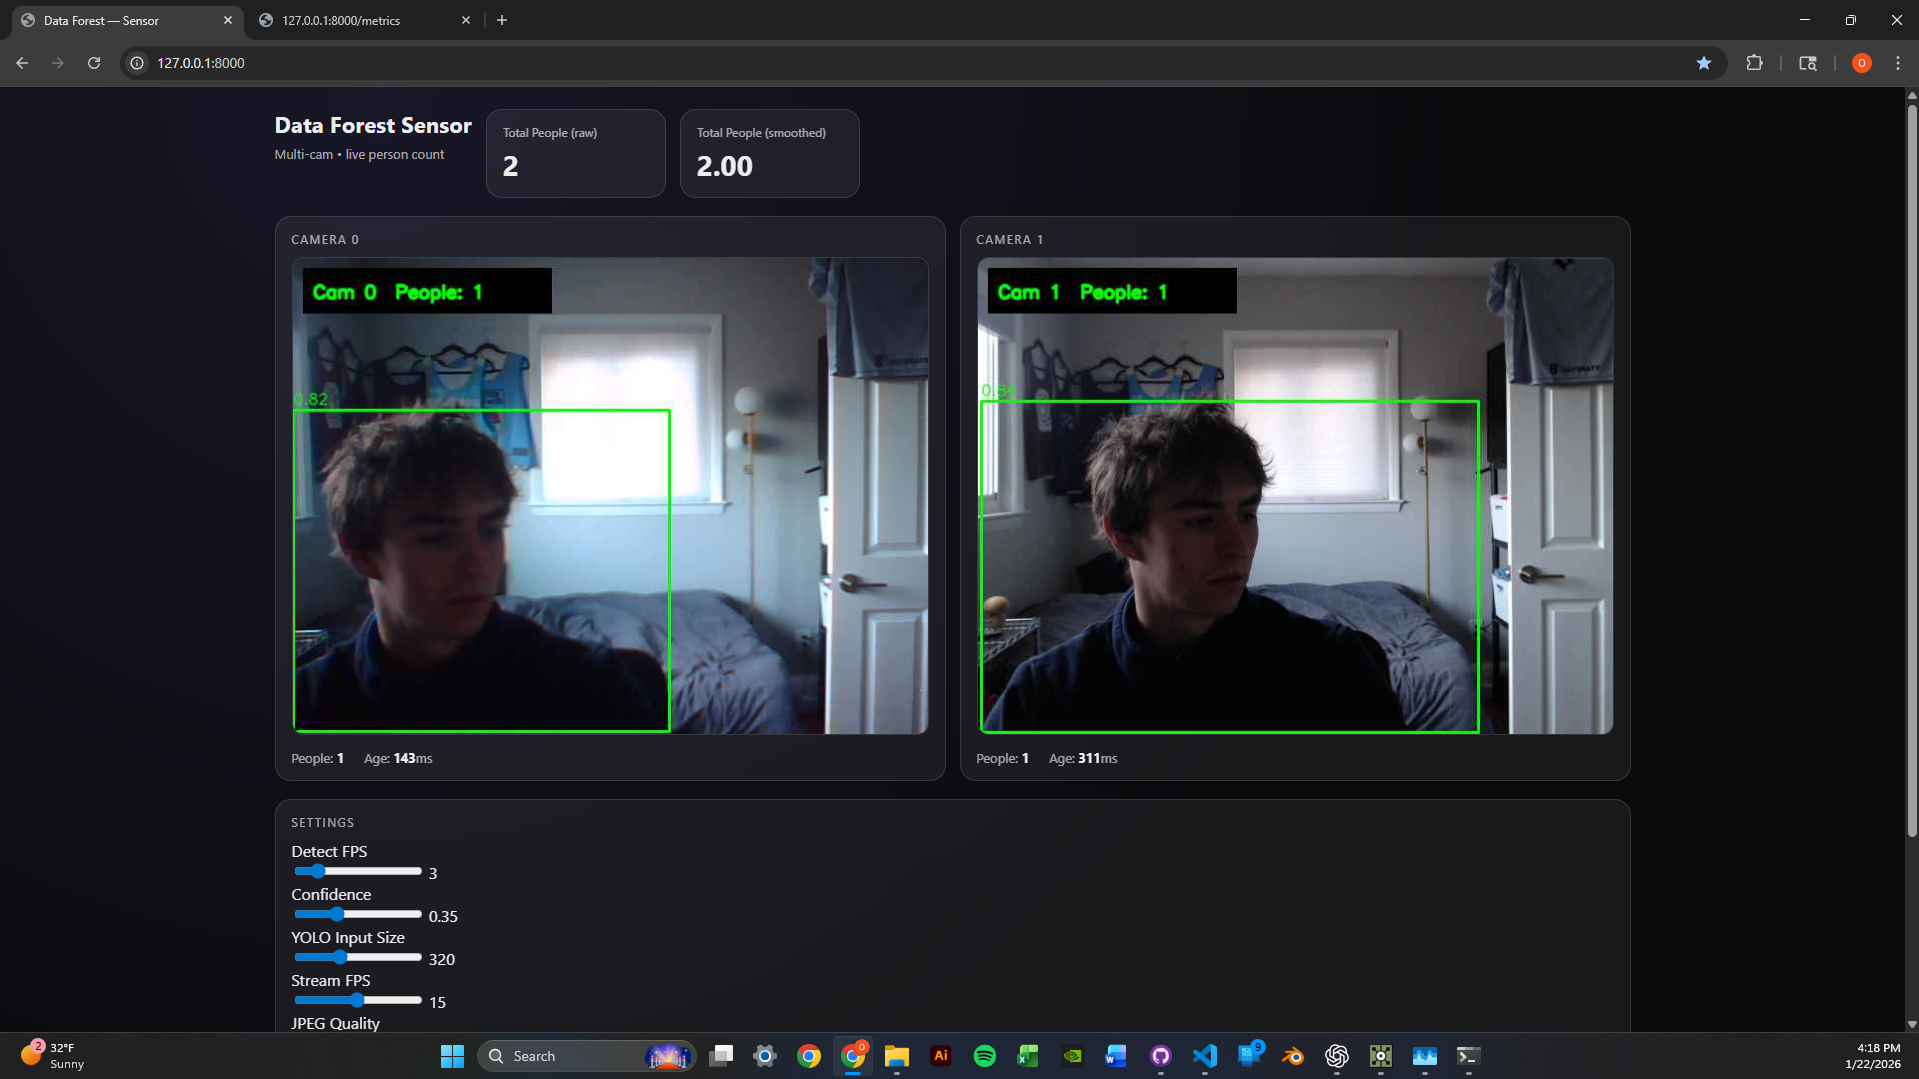
2-Camera Dashboard
I got the dashboard running with two webcam feeds at the same time. Each feed shows live person detection with green bounding boxes and confidence scores. The metrics panel displays per-camera and aggregate people counts with exponential smoothing for stability.
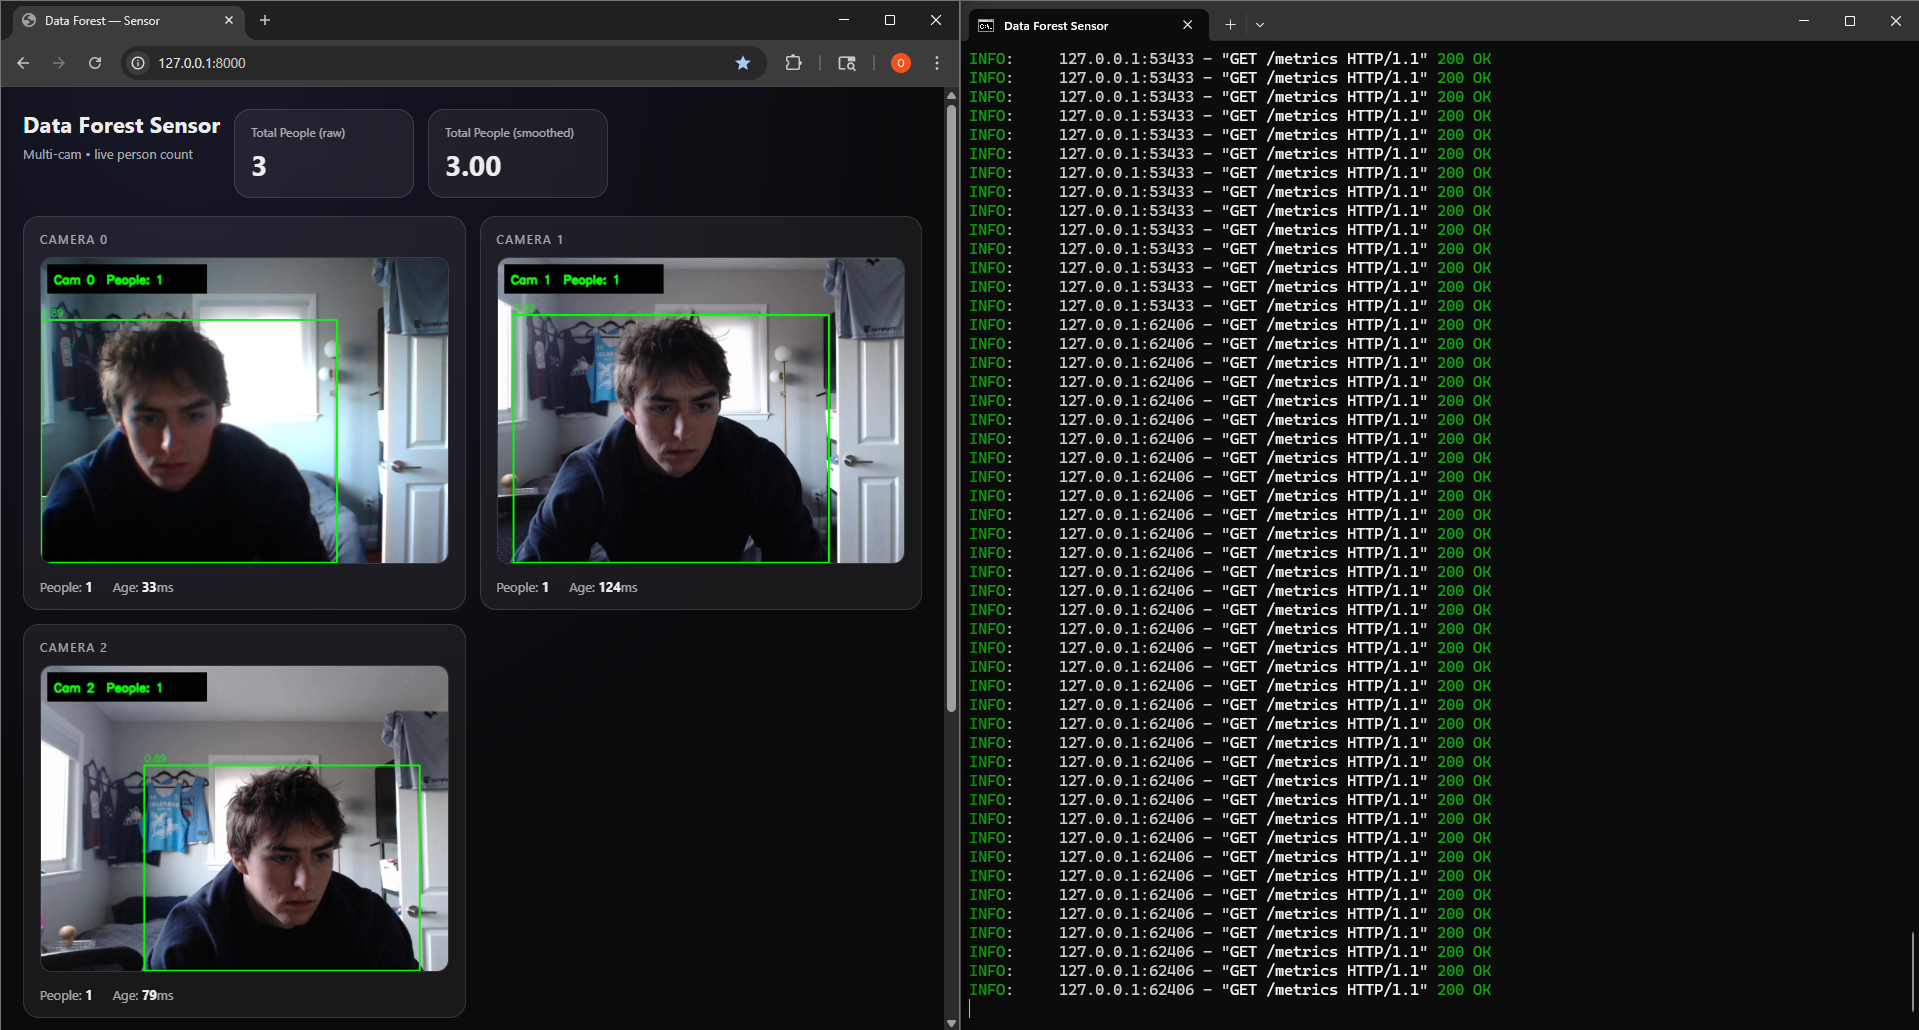
Scaled to 3 Cameras
I scaled the system to 3 concurrent camera feeds. The round-robin detection loop keeps performance steady by distributing inference time across cameras. Runtime parameters like confidence threshold, image size, and detection FPS can be tuned through /settings without restarting.
Technical Highlights
- Thread-safe frame grabbing - Each camera has its own
CameraGrabberthread with lock-protected frame buffers. - MJPEG streaming - Frames are served through
/video_feed/{camera_id}endpoints for browser-native playback. - Metrics API - JSON endpoint returns per-camera counts, smoothed values, and frame ages.
- Hot-reloadable settings -
conf_thresh,imgsz, anddetect_fpscan change without a server restart.
Next Week Goals
- Create reactive TouchDesigner visuals driven by people count data
- Experiment with different visual responses to detection events
- Optimize latency between detection and visual feedback
Week 2: TouchDesigner & Computer Vision Setup
January 13-19, 2026Goals
- Learn TouchDesigner basics through beginner tutorials
- Set up a data pipeline to receive camera input in TouchDesigner
- Test webcams for computer vision capabilities
What I Accomplished
TouchDesigner Fundamentals
I spent time learning TouchDesigner's interface and workflow through beginner tutorials. The main goal was to get comfortable with node-based thinking.
Data Pipeline Setup
I set up a simple data pipeline receiver from a camera module, which gave me the first foundation for live video input.
Webcam Testing
Webcams arrived! Set them up and began testing camera vision in my room, experimenting with tracking and input configuration.
Time Management Reflection
Hours This Week: ~4-5 hours (below 12-hour target)
I traveled Thursday-Monday, which cut into the week more than I wanted. Not ideal. Moving forward, I am committing to the full 12 hours now that I am back, and I need to plan around travel better.
Unexpected Lessons
- Node-based thinking is different - It requires a mental model based on signal flow instead of sequential code.
- Camera quality matters - Positioning and lighting will be critical for detection accuracy.
- Steep but powerful - TouchDesigner has a learning curve, but the potential for real-time visuals is clear.
Next Week Goals
- Dedicate full 12 hours to the project
- Implement blob tracking or motion detection
- Create a basic interactive response system
- Document with photos/videos as I work